How to modify feed data

Key-value pairs make up the feed fields that make up each feed. The number of fields in custom feeds is unlimited, and the field key can be any string. The amount of fields and field keys for pre-configured templates are restricted by the product listing they made for.

To generate field values, the application makes use of adaptable macro-driven input fields. The input field section is shown on Figure 1. Where:

  1. Field key select
  2. Macros block. Several macros can be included in a field value to generate desired results.
  3. Input field
  4. Buttons to insert new macro before target item
  5. Macro sources.
  6. Buttons to insert new macro after target item
  7. Remove input field section button
  8. Checkbox to add field conditions. If conditions are met, the field will be added to the feed.
  9. Input field label. Displays succinct, intuitive field value representations


The macro sources block includes these components:

  1. mappings section with product and shop related mappings, like product price, product title, shop currency;
  2. metafields section, which contains all product/variant matafields;
  3. sources sections, which contains different data sources, like product collections, product tags, list of currencies, list of Google categories and many more;
  4. actions section, includes a list of “actions” that can be used to change the value of a field, such as adding a number or removing white-space. The list of actions is content dependent; it only displays actions that are applicable to the current value, for example mathematical actions are not displayed for textual values, such as captions or titles;
Input field
Figure 1

You must complete those procedures in order to add a new macro element to an input field:

  1. Click inside input field or on the other macro element
  2. Choose the preferred macro source from the popup that appears. (mapping, metafields, source etc)
  3. Select specific macro item
  4. To add a macro before or after the target item, click corresponding button. A new macro will always be inserted after existing macros if on the first step click was inside the input field rather than on the macro item.
 
 
Insert macro
Figure 2. Inserting new macro steps

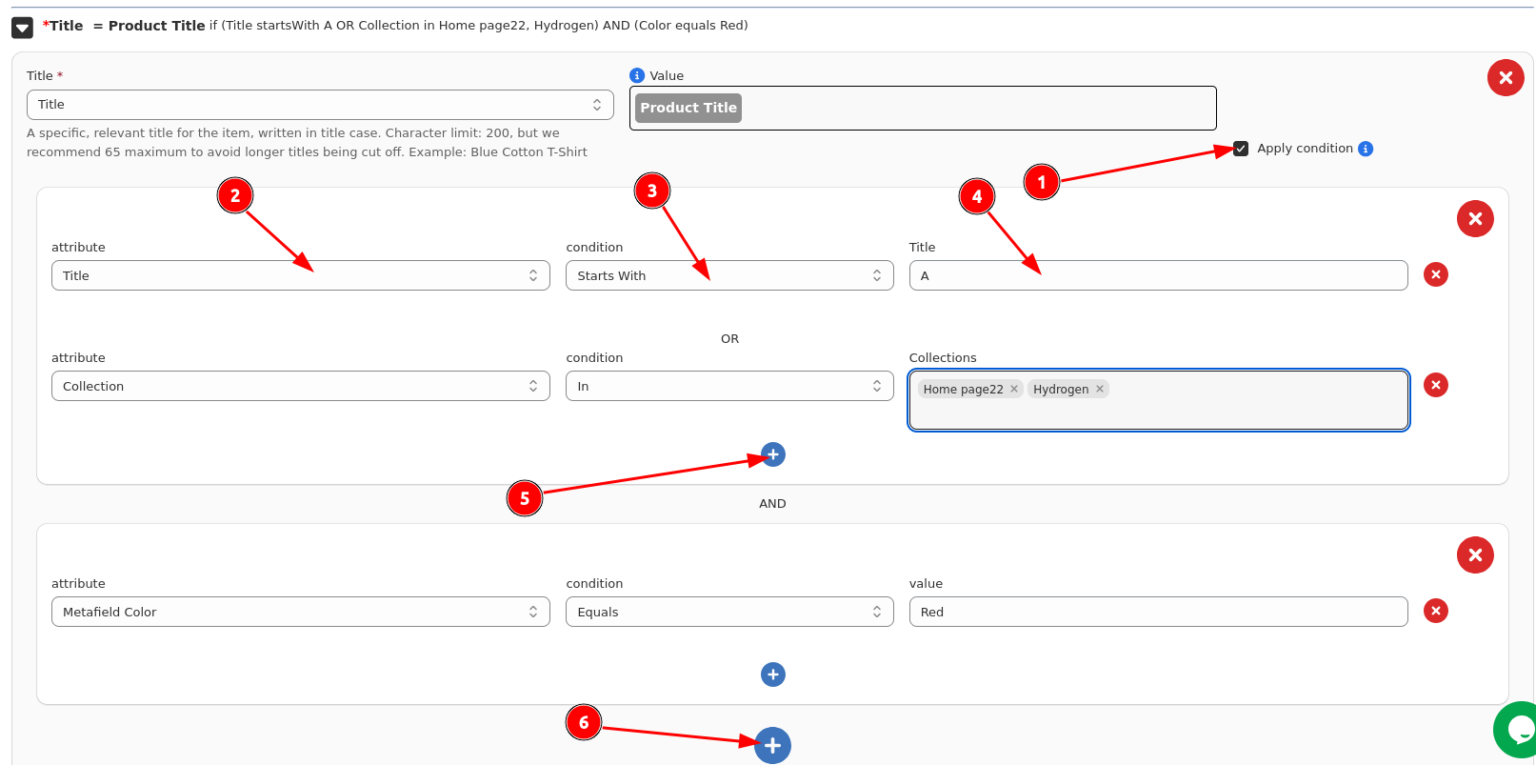
Feed value could be made optional, for example, by applying it only in the event that specific requirements are satisfied. To accomplish this, you must take the actions shown in Figure 3:

  1. Click “Apply condition” checkbox
  2. Select required condition item
  3. Specify condition
  4. Set condition value
  5. (Optional) add OR condition (conditions match if any sub-conditions match)
  6. (Optional) add AND condition (conditions match if all sub-conditions match)
Conditional feed value
Figure 3. Steps to make feed value conditional

Conditions work as follows: if there are feed values with conditions, they are tested in sequence, first matched feed value wins. If no conditions match, feed value without condition apples. If no conditions match and there is no feed value without conditions, feed value will be omitted from feed. Thus required feed values (marked with asterisk) should always have value without conditions.

Accordingly, in the scenario shown in Figure 4, the feed Title value resolves to “Product title #2” if the product title is “Big pajama” and to “Product title #3” (default, non-optional value) if the product title is “Small pajama.”

Feed value rules explanation
Figure 4. Feed conditional values explanation